

It’s obviously some kind of touchscreen, but there were no indications of what it controls. The landlord had no idea what it was. The device had no buttons or labels, just a tiny yellow light indicating that it is powered on.
I had a million questions, but I was too busy with the move, so I forgot about it and only remembered it a week ago. I was going through a large folder of instructions for various devices in my apartment, and this brochure slipped out:
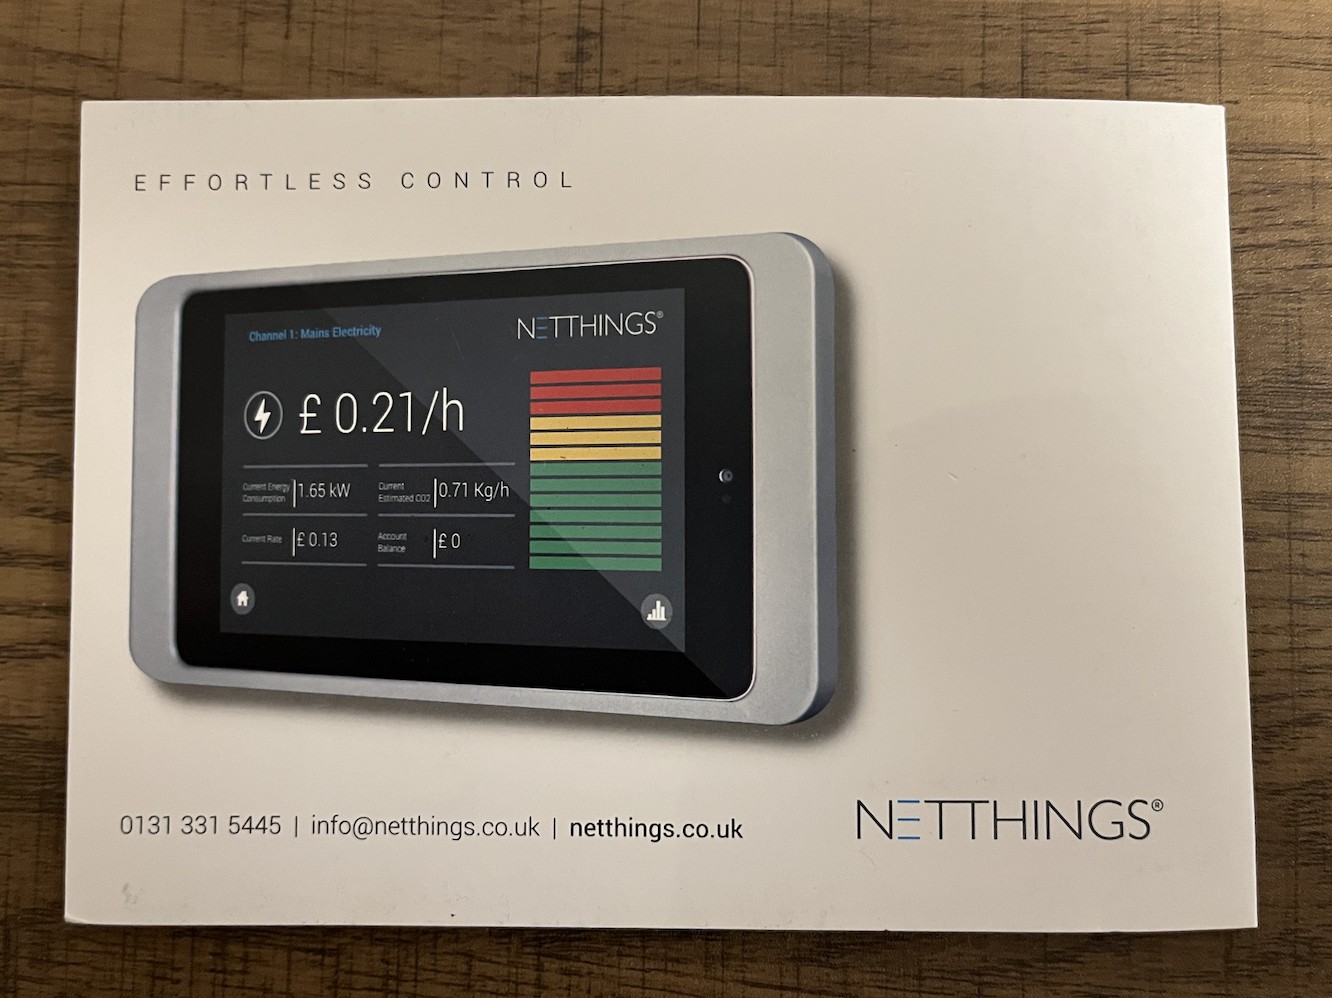
Wow, this is the same touchscreen! It turned out to be part of an energy monitoring system that reports current energy consumption and can display historical data. This seemed very convenient to me – it would be interesting to observe energy consumption patterns in the apartment.
The brochure also mentioned a second part, the so-called “energy manager”, directly connected to the electricity meter to obtain information about energy consumption. I approached the communal electricity meter cabinet, and indeed, it was located in the corner. I had never even noticed these boxes before, but at least they had the same brand as in the brochure – a company with the creative name “NETTHINGS.”

So far, it’s quite simple: we have two devices, one is the “server” collecting data, and the other is the “client” reading this data. The distance between them is very short – only a few meters and two to three walls, a reasonable setup for a cable connection. And at that moment, I noticed a strange sticker in the corner of the brochure. It had two lines printed on it: “SSID” and “Pwd.” I froze in horror. They wouldn’t dare. The distance here is literally three meters. These are embedded devices, why would they need such complexities…
And, of course, it turned out that the two devices communicate via WiFi. This was unusual for me because I am not a developer of applications for embedded devices. However, a friend of mine who worked on smart home features for a voice assistant told me that in fact, this is a quite popular scheme in the IoT world. The letter E in the abbreviation IoT probably stands for “economy.”
Next, I needed to somehow turn on this strange touchscreen. Upon closer inspection, I noticed a small hole on the side that looked like a place where you could insert a paper clip to perform a device reset:

I pressed the hidden button with a wire for a few seconds, and then saw the Android startup logo! Yes, it turned out to be an Android tablet, with a rather old version. It had Google Talk, Flash, and a bunch of other interesting stuff installed:

As far as I understand, it is Android 5, but I’m not sure. One application caught my attention: NetThings. Upon launching it, it goes to a screen where you can selectWiFi network. Unfortunately, the network specified in the brochure was not found in the list. I checked the list twice, tried to refresh it, checked the WiFi networks on my other devices, attempted to connect directly to the WiFi using the provided information, but nothing worked.
When I entered the room with the meters, I noticed something obvious: all the other apartments’ meters had lights on, but mine was somehow disconnected:
I live in the UK, and it’s a land of electrical fuses. Apparently, here it is believed that the more fuses, the better – fuses are everywhere, even in some sockets. Some devices’ fuses come in separate boxes with a small sliding drawer, allowing for fuse replacement. It looks like this:
As you can see, there was no fuse in my box for some reason. No fuse – no electrical connection, no power for the energy manager, and no WiFi access point. Thanks to the fuse box design, it’s easy to replace it, but I didn’t know what current rating was permissible in the network. Fortunately, there were several working energy managers in the same cabinet, so I opened their boxes (disconnecting their power for a few seconds) to see what fuses were installed. Turns out, I needed a 3 A fuse, so I ordered one from Amazon and installed it the next day.
Frankly, all of this was quite scary for me because I was very close to the electrical system. After installing the fuse, I checked its temperature several times a day, looking for signs of trouble. It has been running for about a week now, but I still do not recommend conducting such experiments independently.
After installing the fuse, the energy manager started blinking green LEDs, and the WiFi network appeared on all devices. I selected the network on an Android tablet, and the app moved to the next screen:
Touching the screen, the app moves to this menu, offering the user to choose which resource they want to track. In reality, nothing works here except for “Mains Electricity” because it’s the only meter connected to the energy manager.
Clicking on “Mains Electricity,” we come to the most disappointing screen in UX design history:
Hmm, where to start? First of all, what is that color indicator on the right? What does the vertical position represent? If it’s green, does that mean I consume a small amount of electricity or just average? And how much is “small”? If it rises to the top, is that relative to my historical peak consumption? Over what period?
Out of the five numbers shown to the right of the indicator, only one is correct – the amount of kilowatts consumed (kW). All the other numbers depend on the electricity provider and have definitely changed since this monitor was installed.
And the best part I’ve left for last. The amount of money, as well as an approximate estimate of CO2 generation per kilowatt, cannot be adjusted. According to the brochure, they can be set at initial setup, but there is no information on how to reset the system.to a customizable state.
Furthermore, the brochure states the following:

The date and time are always correct and do not require any adjustment
I have no idea why they wrote this. Of course, since 2015 (the assumed installation date), the clock on the Android tablet has shifted almost 15 minutes.
All of this was quite disappointing. However, I have a few Raspberry Pico microcontrollers at home. If I can connect to the energy manager’s WiFi network and retrieve data from the server, I will simply extract the kilowatt consumption from the API, multiply it by the correct cost, and display it on some Grafana instance.
The main problem is that I don’t know the IP address of the server. I was about to start scanning IP addresses from my laptop, but I noticed in the brochure that there is a possibility to control power consumption through a PC. The instructions included an IP address and port. Opening them in the browser, we see a familiar screen:

It turns out that the interface on the Android tablet is just a webview. This simplifies our work because we can simply go to the web inspector and view all API calls. Looking at the URL, we see…

…Socket.IO! Wow, honestly, I did not expect that. The client literally needs to get only five numbers from the server, so Socket.IO in this case is absolutely unnecessary resource consumption. Moreover, for its functionality, the client-side code looks very complex. It includes no less than six RequireJS modules, and all of them, of course, are dynamically loaded through various requests. There are Handlebars, Backbone.js, Underscore.js… it’s like going back to high school. These were the technologies I was very interested in when I first started learning web development.
But wait, the use of Socket.IO means that there is Javascript running on the embedded device inside the cabinet with the meters? This is probably the strangest edge computing platform I have encountered in my life. I want to deploy something on it!
Completely forgetting my idea of getting data from the server using Raspberry Pico, I put on my hacker hat and started exploring the system. IoT devices have a terrible security reputation, so I expected this to be an easy walk, taking no more than two hours. How wrong I was!
An attempt to connect directly via SSH using the command ssh [email protected] immediately resulted in a “Connection refused” error. This could mean many things, so let’s examine the available ports:
$ sudo nmap -p- -sV -O 172.16.0.254
... partially truncated ...
Nmap scan report for 172.16.0.254
Host is up (0.011s latency).
Not shown: 65530 closed tcp ports (reset)
PORT      STATE SERVICE       VERSION
53/tcp    open  domain        dnsmasq 2.63rc6
80/tcp    open  http          Node.js (Express middleware)
1534/tcp  open  micromuse-lm?
3000/tcp  open  http          Node.js (Express middleware)
41142/tcp open  ssh           OpenSSH 6.2 (protocol 2.0)
Now, this is interesting. As expected, we see a running Node.js server. There is also dnsmasq — a DHCP server (logical, since the device has a WiFi access point) and a hidden SSH server on port 41142.
The SSH connection is no longer rejected, but it turns out that root is password-protected. None of the simple username and password combinations worked.something like admin/admin or root/root, so essentially we’re back to square one. However, nmap has detected an unrecognized service named micromuse-lm on port 1534. The first search result on Google led me to this forum post:

I don’t know who you are, @ljohnson, but may your life be happy and prosperous. There wasn’t much information in this post, but it gave me the necessary keywords for further searches. The most important thing here is tcf-agent. The specific description of what’s happening here is scattered thinly across many websites, each assuming familiarity with terminology. Each of these websites gives you a tiny piece of the puzzle, and you have to put them together yourself. After a few hours and a lot of swear words, I learned the following about tcf-agent:
TCF is short for Target Communications Framework. It’s a text-based protocol that allows reading the file system, launching new processes, sending signals to processes, and much more with the target system. tcf-agent is a server implementing this protocol, or in other words, the second most serious security vulnerability after passwordless SSH root. I don’t understand why the developers went to such trouble with SSH passwords but left the tcf-agent operational.
It seems like TCF is closely related to the Eclipse ecosystem. In the Getting Started guide, various Eclipse plugins are recommended as the main way to interact with tcf-agent. I tried installing these plugins on a new version of Eclipse, but it turned out to be absolutely impossible. Dependency problems cropped up everywhere, and when trying to install missing dependencies, Eclipse doesn’t allow it because they conflict with some other dependencies. It’s a real mess, exactly as I suspected.
Fortunately, the TCF project has a Python SDK. Like with everything else in this research, I had to go through three links on different websites to find it. First, we encounter this cute page:

There was a link on it leading here, where there is very fine print stating that the repository has been moved to this Gitlab repository. Phew. The repository even has a few recent commits, which surprised me a little because overall TCF feels like an abandoned project.
Anyway, the repository has a fairly modern Python 3 (!) SDK, even with built-in documentation. It’s not perfect, some documents are outdated, and some methods are quite strange, but it’s fairly easy to understand what the code is doing. The protocol specification (here and here) greatly helped in this process.
In short, tcf-agent provides a set of services that reveal various parts of the system. For example, there is a FileSystem service for all interactions with the file system, a Processes service for starting/stopping/debugging processes, and so on. Here is an example of getting information about the current user:
import tcf
from tcf.util.sync import CommandControl

tcf.protocol.startEventQueue()
cmd = CommandControl(tcf.connect('TCP:172.16.0.254:1534'))
error, user = cmd.FileSystem.user()
print(user)
And this is how we found out that the tcf-agent actually runs under the user root. Once again, I wonder why bother with SSH passwords if you leave a debug server with root access. I will never understand this.
The FileSystem and Processes services provide other functions roughly corresponding to system calls. With the help of this API, it is quite easy to reproduce alternatives to popular commands like ls, cat, ps, and so on. Now I say “quite easy,” but actually, it took me four hours to guess the protocol format, try to find documentation, fix bugs in the SDK, all while on an extremely unstable WiFi connection from the embedded device. Fun activity. The results can be found in this Github repository.
Now that we have the basic tools, let’s get hacking! First, I tried to hack the root password because I still thought it was trivial. I used the password cracker John the Ripper:
# `cat.py` retrieves file contents from the power manager using the TCF `FileSystem` service.
$ ./cat.py /etc/passwd > passwd.txt
$ ./cat.py /etc/shadow > shadow.txt
$ unshadow passwd.txt shadow.txt > passwords.txt
$ john passwords.txt
I left the cracker running for about seven hours, but it failed to find any matches. John said it would finish its brute force attack in 2035, so I decided to try a different approach.
After some searching, I found out that I could simply leave the root password blank by modifying /etc/shadow. Doing this, I turned off the device by removing the previously installed fuse and turned it back on, reinserting it after some time. Unfortunately, SSH still refused my login attempts.
More out of desperation than anything else, I decided to look at the host’s sshd configuration and finally found the culprit. In sshd_config, there was the line PermitRootLogin no—a very reasonable security measure if you’re not providing full disk access to anyone on the network.
I replaced this line with PermitRootLogin yes and saw the result I had been fighting for:

We’re in! Phew, what an adventure, right? Let’s take a look around!
root@nt-core:~# uname -srm
Linux 3.10.28 armv5tejl
We see that the system is running Linux 3.10, which is a fairly new release (mid-2013), considering that the device was developed and installed around 2014-2015. Inside, an ARM chip is installed, which is quite normal for an embedded device:
root@nt-core:~# cat /proc/cpuinfo
processor	: 0
model name	: ARM926EJ-S rev 5 (v5l)
BogoMIPS	: 226.09
Features	: swp half fastmult edsp java
CPU implementer	: 0x41
CPU architecture: 5TEJ
CPU variant	: 0x0
CPU part	: 0x926
CPU revision	: 5

Hardware	: Freescale MXS (Device Tree)
Revision	: 0000
Serial		: 0000000000000000
This CPU is from the ARM9 family. Wikipedia says it was released in 2001, and it was also mentioned that it was used as a coprocessor in the Nintendo Wii.
Even more surprising to me was that thisThe processor supports direct execution of Java bytecode. Yes, you read it correctly, java in the list of CPU functions actually means the one and only Java. The ARM extension for this function is called Jazelle. It seems that in the 2000s this was a trend, because I encounter this feature not for the first time.
root@nt-core:~# cat /proc/meminfo
MemTotal:         118172 kB
...the rest I have cut out...
In addition, the device has 118 MB of RAM. I am not an expert in Linux for embedded systems, but after working with Raspberry Pi Pico and similar devices, this seems like a fairly large amount. At the same time, it seems logical because there is a Node.js application running on the host, and JavaScript does not use memory very efficiently.
The application itself is a large codebase. Although the company that created the device and the software for it no longer exists, I do not want to take any risks by publishing the source code. I am almost sure that nobody will care about it, but I still prefer not to get involved. So instead, let’s just examine the lists of files.
The structure of the top-level folders looks like this:
root@nt-core:/srv/server# ls -la
...listing of files...
As far as I understand, the application consists of two parts. The first one is responsible for reading power consumption data from the meter connected to the device. This part is called the “Pulse app,” and its binary file is located in the bin folder:
root@nt-core:/srv/server# ls -la bin
...listing of files...
“`html
1 nodejs nogroup 758 Oct 14 12:13 reset_nrg_mgr.sh
drwxrw---- 2 nodejs dialout 4096 Nov 16 01:00 weekly
drwxrw---- 2 nodejs dialout 4096 Oct 23 11:00 yearly
Upon analyzing the debug symbols, I initially thought it was a regular C application, which seemed suitable for interacting with low-level GPIO contacts. However, I became intrigued by the file pulse.ko. The extension .ko typically denotes a Kernel Object, so it could actually be a kernel module. But I have limited knowledge about kernel modules, so I could be mistaken.
The “Pulse app” reads data from GPIO contacts and saves the results in CSV files. These CSV files are divided by months, days, and hours in folders with corresponding names, also located in the bin directory. This division is not random. The historical data mode in the energy manager’s web UI only supports displaying data by month, day, and hour.
In addition to the “Pulse app,” there is a second part of the application. A Node.js application reads CSV files filled with energy consumption data and presents them to the user in a web UI. It uses Node.js 0.10.26, Express.js 4.13.3, and Socket.io 1.3.6.
While exploring dependencies, I noticed the mqtt package. This intrigued me because I had not yet seen any interaction with a message broker. After delving a bit more into the source code, I concluded that it was an incomplete integration with the cloud, as promised by the company Netthings in their brochure. The source code even mentions hard-coded IP addresses used to connect to the message broker. It is not surprising that none of these IP addresses exist anymore. I am not even sure how it was supposed to work, as the device does not have internet access.
Ultimately, it was a very interesting investigation! I deemed it as “My urban archaeological project.”
P.S. As a finishing touch, I decided to leave a small note in the home directory. It feels strange to realize that I am probably the only person who will read it. But perhaps in the distant future, another software developer will live in this apartment and find it. Only time will tell…

P.P.S. HackerNews user M6WIQ mentioned another article on the consequences of NetThings engineering decisions. Great read!
P.P.P.S. The author of the aforementioned article replied to me on Mastodon and asked if the device still used his NTP server IP address. The truth turned out to be much worse.
P.P.P.P.S. Mark Bevan kindly offered me the use of his GPU resources for brute-forcing Linux user passwords in the energy manager. It turns out they were hashed using an algorithm that is at least thirty years old and poses no difficulty for modern computing power. The passwords used for the root and gecko_user accounts were Newt@rd$, and for the prod_test account, it was NetTh@ng, which is quite ironic.
For more interesting articles, visit my website here.
Telegram channel with discounts, prize giveaways, and IT news 💻

Acknowledgement and Usage Notice
The editorial team at TechBurst Magazine acknowledges the invaluable contribution of the author of the original article that forms the foundation of our publication. We sincerely appreciate the author’s work. All images in this publication are sourced directly from the original article, where a reference to the author’s profile is provided as well. This publication respects the author’s rights and enhances the visibility of their original work. If there are any concerns or the author wishes to discuss this matter further, we welcome an open dialogue to address potential issues and find an amicable resolution. Feel free to contact us through the ‘Contact Us’ section; the link is available in the website footer.
“`


