

Electron is an open-source framework for creating cross-platform desktop applications using JavaScript, HTML, and CSS. It’s a cool technology, but it comes with many cybersecurity risks.
In this article, I will explain the basics of safely working with this framework and will talk about:
- how to analyze the structure of Electron desktop applications and find vulnerabilities in them;
- what common mistakes are made when working with the framework and how secure it is.
Let’s start with the tools and methods I use to analyze application code. Then I will demonstrate specific examples of exploiting vulnerabilities using target applications: DVEA, Electro-xxs, and Notable.
Hello, Habr! My name is Alexander, I work as an information security specialist. This article is based on a presentation I gave during an internship program organized by Bastion company.
Atom, Visual Studio Code, WordPress Desktop, Github Desktop, Basecamp3, Mattermost – are just a few examples of applications created using Electron. The framework combines Chromium (for rendering content using HTML5, CSS3, and JavaScript) and Node.js (providing a runtime environment for JavaScript, granting developers access to server-side functions). This combination gives the framework a number of advantages.
| Electron Features | |
|---|---|
| Cross-Platform | Applications can run on Windows, macOS, and Linux. |
| Web Technologies | Developers can use HTML, CSS, and JavaScript to create the user interface and application logic. |
| Security | Various tools and recommendations can be applied to minimize risks associated with executing external code. |
| Support for Third-Party Libraries and Plugins | Third-party libraries and plugins can be integrated to extend application functionality. |
At the same time, Electron inherits a number of security vulnerabilities typical for regular web applications, and it has even more capabilities. The framework has access to the file system, user scripts, and so on. For example, consider an application with multiple tabs or windows. There can be a scenario where malicious code is executed in one tab or window, leading to negative consequences in other tabs or applications.
To address this issue, Electron uses a multi-process model. It includes two main types of processes:
- Main Process, controlling the core aspects of the application;
- Renderer Process, responsible for rendering content in application windows and executing JavaScript code.
Process separation provides isolation and independence between different components of the application, increasing security levels and preventing unwanted interactions between tabs. Essentially, the Main Process can create Renderer Processes, thus ensuring controlled

This is roughly what the relationship between the renderer process and the browser window looks like in Electron:
- The Renderer Process loads and displays a page or HTML content in the application window;
- The browser window displays the visual interface of the application (for example, if the starting page is index.html, the content from the index.html file will be displayed in the browser window).


For flexible Electron configuration, there are webPreferences – parameters related to defining various characteristics of a web page.

Example of webPreferences. nodeIntegration: true — the page has access to the Node.js API
Among them are parameters that provide new capabilities for the renderer process. For example, nodeIntegration allows the use of Node.js within the display process, while contextIsolation controls direct access to the Node.js API from the page code. See how Electro-XSS changes behavior depending on the webPreferences settings.
Active access to Node.js API, provided by nodeIntegration in combination with XSS in the renderer process, opens up the possibility of Remote Code Execution, despite the multi-process model of Electron.

nodeIntegration + XSS in the renderer process = RCE
Tools and Analysis Methods
For automated code analysis and finding similar errors in Electron, popular static and dynamic analyzers are widely used.
| Static Analysis | |
|---|---|
| ESLint and TSLint | Checking code for style compliance, identifying potential errors, and improving readability. |
| SonarQube | Continuous monitoring of code quality and detection of various vulnerabilities. |
| CodeQL | Creating queries to search for vulnerabilities in code, such as SQL injections or memory problems. |
| asar -> decompile -> read Source code | Extracting source code from an archive file in asar format. |
| Dynamic Analysis | |
| DevTools | Real-time code execution tracking and performance profiling through built-in developer tools in the browser. |
| BurpSuite | Security testing of web applications through intercepting and modifying traffic between the client and server, session analysis, or integration with other frameworks. |
However, there are also lesser-known but more specialized utilities, both console-based and equipped with a graphical interface.
Electronegativity
This tool is designed to detect incorrect configurations and security anti-patterns in applications.
You can install major releases of Electronegativity from the NPM package repository using the console command: $ npm install @doyensec/electronegativity -g
Then, to check the application for vulnerabilities, type: $ npm audit
Example of running a scan: electronegativity -i DVEA
Electronegativity represents the code structure in a tree format and analyzes its hierarchical structure, checks the structure of the web page (DOM), and generates a detailed report.

Also, pay attention to ElectroNG – a specialized security scanner developed by the creators of Electronegativity for conducting automated checks.
NodeJsScan
This is a free and open-source scanner of static code. It is capable of detecting insecure patterns in Node.js and HTML code and provides a convenient web interface for managing discovered security issues. One of its advantages is easy integration with various CI/CD pipelines: Github Actions, Gitlab CI/CD, Travis, etc.

The tool can be launched as follows:
- Download the latest version of the Nodejsscan image from Docker Hub.
docker pull opensecurity/nodejsscan:latest - Run the container (port 9090) for the Nodejsscan web interface.
docker run -it -p 9090:9090 opensecurity/nodejsscan:latest - Go to the Nodejsscan page.
http://localhost:9090
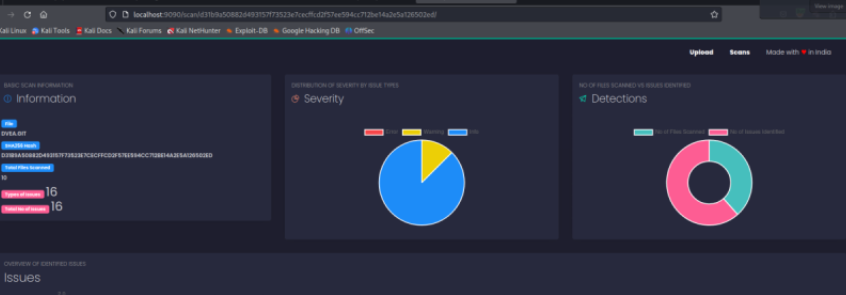
Let’s test Nodejsscan using the example of the vulnerable application Damn Vulnerable ElectronJS App (DVEA).

The scanner provides a detailed report:

By selecting the vulnerability of interest with Hide Code, you can get detailed information about its specifics:

Njsscan (CLI)
This static analyzer detects vulnerabilities using patterns from the libsast library.
To install, use the command: pip install njsscan
Njsscan utilizes semantic code pattern search using the semgrep tool.

Semgrep commands are executed with different configurations (rulesets) that determine which specific checks and tests will be performed.
$ semgrep --config=r/javascript.browser.security.insufficient-postmessage-origin-validation.insufficient-postmessage-origin-validation --config=r/javascript.lang.security.audit.incomplete-sanitization.incomplete-sanitization --config=r/javascript.browser.security.dom-based-xss.dom-based-xss --config=r/typescript.react.security.audit.react-css-injection.react-css-injection--config=r/typescript.react.security.audit.react-href-var.react-href-var --config=p/owasp-top-ten __CODE_DIRECTORY__
Snyk CLI
Snyk is a cloud security tool designed to detect potential vulnerabilities in application code in real-time. It can also identify errors in Kubernetes container images as well as insecure configurations in Terraform and Kubernetes.
Snyk CLI is installed using npm: sudo npm install snyk@latest -g
To check the functionality of Snyk CLI, use the command: snyk --help
To start using Snyk CLI, authentication is required using: snyk auth
Then you can begin scanning your project:

For example, let’s follow a link with a snapshot:

The scanning results are quite predictable:

Let’s try another demo application — Electro-XSS:

Here Snyk also finds vulnerabilities:

Features of Manual Testing of Electron-based Applications
The general procedure for testing desktop Electron applications is divided into three stages.
| Decompilation | → | Modification and Recompilation | → | Setting up communication channels |
|---|---|---|---|---|
| To analyze, it is necessary to extract the source code. | This stage is important to add additional debugging to the code or bypass any client-side controls. | This process is necessary for testing the server-side APIs. |
Let’s try to examine this sequence in more detail.
Decompilation
Manual testing of an application begins with unpacking files in .asar format. You can find them in the resources directory. If you have NodeJS installed, use the npm command to ensure the correct operation of the Node package manager.
Use the command npm install –engine-strict asar, responsible for installing the asar application using the npm package manager.

The command npm install -g asar is responsible for installing asar globally.

Use the command asar extract app.asar app to extract the source code from the archive.
Modification and Recompilation
If there is a need to modify the source code and apply changes at the time of application launch, repackage the app.asar file.
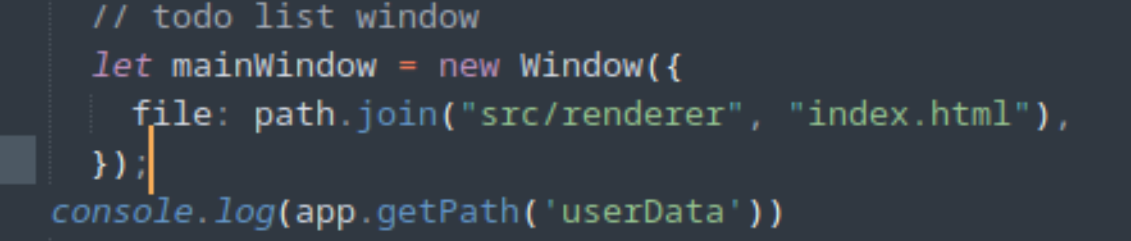
I modified the createWindow function by adding a new debugging string, as shown in the screenshot.

Setting Communication Channels
To capture traffic and then modify a request during the application’s operation, you will need to configure a proxy in Burp Suite. There are two ways to proceed.
-
Operating System Level Proxying
This approach is useful when you need to see HTTP/HTTPS requests issued by the target application. In this case, an electronic command-line argument is added. If we go back to the createWindow function, we already have two examples:

createWindow is a function showing commandLine.appendSwitch. In line 58, the added switch is already present: app.commandLine.appendSwitch('proxyserver','127.0.0.1:8080');
Then the app folder is packed into the app.asar file again, and Electron loads Chromium (don’t forget to install the CA certificate Burp certificate, as shown here).
After setting up the proxy, you will see all HTTP/HTTPS traffic passing through Burp, and you can start making requests on the server side.
-
Application Level Proxying
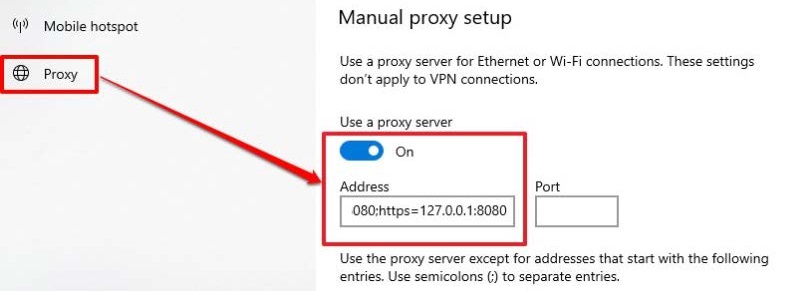
Implementing this approach will depend on the architecture of the specific application and the technologies used in it. Let’s look at the process of setting up a proxy server for intercepting traffic on a Windows machine in Burp Suite.
First, you need to set up the system proxy using the command: netsh winhttp set proxy proxy-server="http=127.0.0.1:8080;https=127.0.0.1:8080" bypass-list="*.local"
This will set up a system proxy server for HTTP and HTTPS traffic to the address 127.0.0.1 (localhost) and port 8080. *.local files will bypass the proxy. To verify that the settings have been applied, run: netsh winhttp show proxy You should see the configured proxy parameters in the output.
Then, make sure that the Burp Suite proxy server is running and configured to listen on the same port (in this case, 8080).
Export the Burp certificate and open the Console using the command mmc.
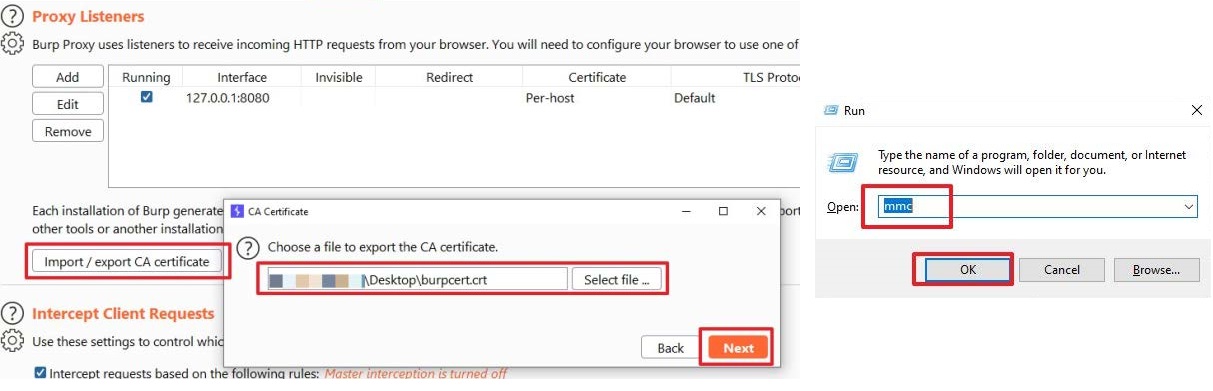
Go to “File-> Add/Remove Snap-in…”, then -> “Certificate -> Add -> Computer account -> Next”.

Select “Local Computer”, click “Finish”, and confirm the certificate selection:

Go to “Certificates -> All Tasks -> Import”. Choose the path to the imported Burp certificate and click “Next”.

Select “Place all certificates in the following store” and click “Next”. Click “Finish”.

Finally, make sure that the BurpSuite certificate has been installed.

And start intercepting the traffic.

Types of Attacks and Examples of Vulnerability Exploitation
When developing and testing applications, it is important to consider the possibility of encountering a variety of issues.
| Npm Dependency Vulnerabilities | When using Electron.js, which includes various npm packages, there is a potential threat of inheriting vulnerabilities. |
|---|---|
| Remote Requests | Electron.js applications by default allow remote requests with access to system resources. This creates a potential risk of executing malicious code from a remote server on the user’s device. |
| Web Content Vulnerabilities | If an Electron.js application displays web content from unreliable sources, there is a risk of exploiting XSS vulnerabilities. |
| Data Leaks | Using Node.js in Electron.js to access OS resources can lead to potential data leaks. It is important to handle data carefully and take measures to prevent leaks. |
| Node.js Package Vulnerabilities | Some Node.js packages used in Electron.js may contain vulnerabilities. It is important to monitor security updates and promptly apply vulnerability fixes. |
| XSS Vulnerabilities | Injecting malicious JavaScript code into an application is performed in the context of other users or applications, which can lead to stealing user data or carrying out malicious actions on their behalf. |
| Remote Code Execution | Electron.js applications can load remote code from servers. Without proper security measures, a malicious actor can tamper or inject malicious code that will be executed on the user’s machine. |
| Denial of Service, DoS | DoS attacks aim to overload application resources, making it unavailable to other users. |
| File System Attack | Improper handling of files by Electron.js applications can allow a malicious actor to use fake or malicious files to access the user’s file system or perform malicious operations. |
| Privilege Code Execution | Electron.js applications can have direct access to system resources. |
Let’s take a closer look at some of them
Cross Site Scripting
This type of attack involves injecting malicious code into an application. Cross-Site Scripting XSS attacks on Electron-based applications are similar to attacks on web applications in general. However, there are some differences in the mechanisms of injecting malicious code. Let’s denote them.
- Desktop applications typically do not have a separate URL input field, as in web browsers. As described in the methodology section, DevTools Desktop applications can be used to interact with APIs.
- Electron allows applications to interact with the user’s local file system. If input data from the file system is not properly secured, this can lead to XSS vulnerabilities.
- Working with protocols:Electron supports basic protocols (e.g. HTTP, HTTPS) and also allows creating custom protocols. If these protocols are not properly secured, they can also be the cause of XSS vulnerabilities.
These attacks can lead to theft of user data, authentication session hijacking, redirection to malicious websites, injection of malicious scripts, and other unwanted consequences. Preventing XSS involves filtering and escaping input data, using secure APIs, and regularly updating security policies.
Launching a process exploitation script in the input field looks as follows:
This code will be executed in the user’s desktop application if it incorrectly processes or escapes incoming data. In this specific example, the
tag is used to insert an image, and in case of an image loading error (the onerror attribute), the JavaScript code alert(1) will be executed, displaying a dialog box with the message “1”.
### XSS to RCE
Examples of payloads for RCE in this context:
– For Linux and MacOS
“`plaintext
“`– For Windows
“`plaintext
“`In both cases, the
tag and the onerror event are used, which calls require(‘child_process’).execSync() to execute commands in the system shell. Such commands can be used by malicious actors to execute arbitrary code on the client-side and pose a serious security threat to the application.
To protect against this, it is recommended to properly configure Content Security Policy (CSP) and restrict the use of nodeIntegration.
### Exploiting XSS and RCE Based on DVEA Example
Damn Vulnerable ElectronJS App is a vulnerable ElectronJS application designed specifically for educating cybersecurity professionals and developers. It is designed to demonstrate basic vulnerabilities typical of the ElectronJS environment.
To run DVEA, use the following command:
“`plaintext
cd DVEA
npm i
electron .
“`To start using npm:
“`plaintext
npm install yarn
npm start
“`DVEAAllows you to see examples of vulnerabilities, including XSS. For example, inside the application, you can use such a payload:
<img src=x onerror=alert(1) />
This code will display a window with a warning containing arbitrary text. Right away, if you enter the correct useful payload in the renderer process DVEA, you can implement an RCE attack:
<img src=x onerror=alert(require('child_process').execSync('mate-calc')); />
Demonstration of Attacks Using Electro-XSS
As implied by the name, this targeted application is designed to demonstrate vulnerabilities based on XSS.

Let’s look at the scenario of exploiting XSS when you need to inject JavaScript code into a page input field. Such code can be used for attacks on users, for example, for stealing session data.

Let’s execute the exploitation script:
XSS: <img src=x onerror=alert(1) />
RCE: <img src=x onerror=alert(require('child_process').execSync('gnomecalculator'));/>Executing this JavaScript code will launch the GNOME calculator. Such scenarios can be used for attacks on applications, especially if the nodeIntegration parameter is set to true, allowing Node.js code execution in the display process.
RCE Using Notable as an Example
XSS attacks allow intruders to inject and execute their code on the client-side. For example, when using Node.js in an Electron-based application, there can be a threat of Remote Code Execution (RCE). An example XSS payload that can inject a command to launch the calculator into a vulnerable application is:
<img src=x onerror=alert(require('child_process').execSync('mate-calc')); />
In the absence of input filtering or restrictions, an intruder can inject arbitrary commands into various fields of the application. For example, using the ls command allows you to view the contents of the current directory and obtain additional information about the file system.

To see how this happens in practice, let’s launch the application Notable version 1.5.0 and enter the payload.
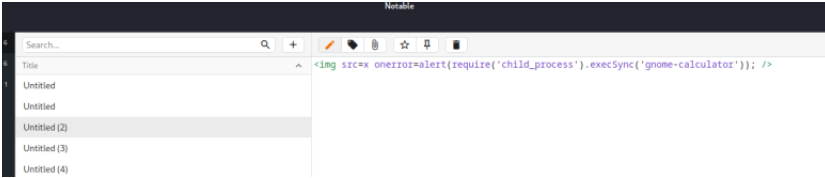
After exiting the editing mode, the payload command will be executed automatically. All that remains is to exploit the vulnerability:

Methodology for Penetration Testing Desktop Applications
Analysis of the desktop application’s logic before testing plays a key role in assessing its security.
Reversing Electron Application is a method aimed atTo gain access to the source code of the application, which allows for a more in-depth and detailed analysis. Building a pentest methodology largely depends on this stage, as access to the source code helps identify the application’s workflow, uncover logical chains, and understand its behavior and internal structure.
Ultimately, this speeds up and facilitates the search and analysis of potential vulnerabilities.
### Pentest Methodology Using Notable as an Example
To practice and conduct a detailed investigation, we will use [notable](https://github.com/notable/notable) version 1.5.0 and download the file [Notable-1.5.0.dmg](https://github.com/notable/notable/releases/tag/v1.5.0) and [Notable-1.8.4.AppImage](https://github.com/notable/notable/releases/tag/v1.8.4). Don’t forget to grant permission to use this application.
Mount the application disk image (to a temporary folder):
Open this folder:
In this folder, you can already see the application files and resources.
Next, you need to copy the file **app.asar** to the working folder and change the file format **.dmg** (you can use the application [HFSleuth](http://newosxbook.com/tools/hfsleuth.html) for this purpose).
We need to launch this program specifying the binary file Notable-1.5.0.dmg.
Find the Notable.app file.
Then try to enter it.
Download the app.asar file (an archive containing the source code for the electron application) by writing it to a temporary folder.
“`
Command: asar extract app.asar dest-folder
“`To reverse engineer the file, follow these steps:
The file will be extracted in reverse order. Next, you will need to launch Sublime Text to view the contents of the files.
If you need to find vulnerable spots in dependencies, **npm audit** will be useful.
To address this issue, you need to disable package locking:
– **package.json** contains various metadata as well as information about dependencies and versions;
– **The main process** acts as the entry point to the application;
– **Index.html** is the frontend of the application.### Pentest Methodology Using Electro-XSS as an Example
Now let’s look at vulnerability analysis work using the example ofElectro-XSS.

After deploying the application, let’s launch Sublime-text to view its files:

Here, you can see the entry point of the application:

In the package.json file, you can find the main field to identify the entry point.
We already know that webPreferences parameters are responsible for configuring the web page. When the nodeIntegration parameter is set to true, the Node.js API becomes available. If there is a Cross-Site Scripting (XSS) vulnerability in the application, a successful attack could allow an attacker to execute arbitrary code on the client side, enabling Remote Code Execution (RCE). In such cases, it is recommended to use contextIsolation along with preload for script preload:
const mainWindow = new BrowserWindow({
  width: 800,
  height: 600,
  webPreferences: {
    contextIsolation: true,
    preload: path.join(__dirname, 'preload.js'),
  },
});
For example, let’s try changing the nodeIntegration parameter to false:

npm install
npm run eletro-xss
Using Ctrl+Shift+I, we will open Devtools:

And we will try to access the node interface API through the console.
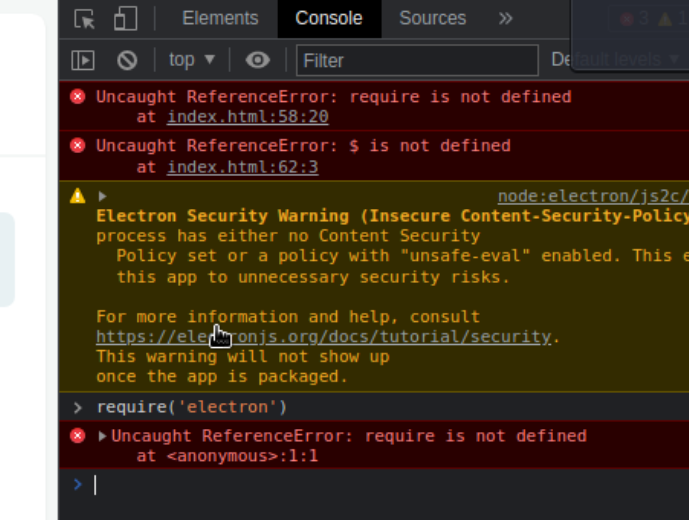
Since we are unable to access, we will try to disable the application and use nodeIntegration, and then send a restart command. Our task here is to invoke the node interface APIs to exploit RCE (Remote Code Execution):

The attempt was successful. The purpose of such node integrations is to call the node interface APIs to exploit RCE.
Instead of Conclusion: Security Electron.js
To ensure the security of Electron applications, it is important to strictly follow the security recommendations from the Electron repository on github.
Key steps include:
- Setting nodeIntegration to false and contextIsolation to true;
- Validating input in form fields;
- Controlling the process of creating new windows (or blocking them if unnecessary);
- Using an up-to-date version of Electron.js;
- Checking all security parameters set by default (especially when using third-party frameworks);
- Controlling integrations with Node.js.
An additional measure can be blocking unnecessary privileges granted to the application. This reduces the attack surface and prevents unwanted access to system resources.
Acknowledgement and Usage Notice
The editorial team at TechBurst Magazine acknowledges the invaluable contribution of the author of the original article that forms the foundation of our publication. We sincerely appreciate the author’s work. All images in this publication are sourced directly from the original article, where a reference to the author’s profile is provided as well. This publication respects the author’s rights and enhances the visibility of their original work. If there are any concerns or the author wishes to discuss this matter further, we welcome an open dialogue to address potential issues and find an amicable resolution. Feel free to contact us through the ‘Contact Us’ section; the link is available in the website footer.
")


")
